JSON APIs with Laravel: Part 2 - Models, Factories, and Seeders
Oliver Sarfas • July 15, 2019
programming laravelRecap:
If you haven't read part 1, you can find it here;
We looked at what APIs do, and what kind of functionality we're looking to achieve with this little series. We also established that we're going to create a JSON API, and why we chose this over XML.
Let's Go!
flex justify-center items-center bg-blue-500 border border-blue-500 h-10 px-5 rounded-full lg:hidden focus:outline-none First off, we need to make sure we've got some data to expose over our service. In this series, we're going to make a basic Contact Sheet with names, addresses, email-addresses, and contact numbers. You'll be able to see all contacts, edit one, create new, and all the core functionality that we looked at in Part 1. So let's create some data!
First off, we need a fresh laravel installation, which we can achieve by following the Laravel Installation documentation;
https://laravel.com/docs/5.8/installation
Assuming we've got that going and working well, we're going to open up a console and run some commands to build some scaffolding for us.
php artisan make:model Contact --all
You'll notice that we've added --all to the command, this means that we'll not only get the Model, we get a Resourceful Controller, Factory, and Migration for the Model. We get the following files;
- app\Contact.php
- app\Http\Controllers\ContactController.php
- app\database\migrations\2019_07_14_124212_create_contacts_table.php
- app\database\factories\ContactFactory.php
First up, we'll look at the Migration file, and putting some fields in.
Migration
For our Contact we want to show a; name, email address, contact number, and address. So let's add those fields into the migration in the up() function.
Our migration now looks like this;
<?php

class CreateContactsTable extends Migration {
    public function up() {
        Schema::create('contacts', function (Blueprint $table) {
            $table->bigIncrements('id');
            $table->string('name');
            $table->string('email');
            $table->string('contact_number');
            $table->string('address');
            $table->timestamps();
        });
    }

    public function down() {
        Schema::dropIfExists('contacts');
    }
}
Factory
We've got a table with some fields, now to stick some data in it! In Laravel we can use factories to generate us some fake data that is ideal for mocking applications and demonstrations.
Go into the app\database\factories\ContactFactory.php and make the following;
<?php
/* @var $factory \Illuminate\Database\Eloquent\Factory */

use App\Contact;
use Faker\Generator as Faker;

$factory->define(Contact::class, function (Faker $faker) {
    return [
    'name' => $faker->name,
    'email' => $faker->safeEmail,
    'contact_number' => $faker->phoneNumber,
    'address' => $faker->streetAddress
    ];
});
Model
We've got a table, with some "fake" data, however right now - the factory will fail to insert data as the Model still has no fillable properties. One of the "perks" of Laravel is that by default all of a Model's properties are guarded. This is to stop mass-assignment. So let's turn that off for our fields;
This allows the listed properties to be updated and injected as necessary.
<?php

namespace App;

use Illuminate\Database\Eloquent\Model;

class Contact extends Model
{
    protected $fillable = [
        'name',
        'email',
        'contact_number',
        'address',
    ];
}
Seeder
So we're going to make a seeder to populate the data. We're too lazy to run factory commands from the console everytime, so Seeders would be the easiest way to automate it. We'll need to make a seeder class using the console again;
php artisan make:seeder ContactSeeder
This will produce the app\database\seeds\ContactSeeder file that we're going to put data into and it'll produce us some details into our database. So, update the file to say the following;
<?php

use Illuminate\Database\Seeder;
use App\Contact;

class ContactSeeder extends Seeder
{
    /**
    * Run the database seeds.
    *
    * @return void
    */
    public function run()
    {
        factory(Contact::class, 10)->create();
    }
}
We'll just need to add $this->call(ContactSeeder::class) in our main DatabaseSeeder class that Laravel ships with.
Bringing it all together
From the command line, we can now run all our files, and check that we've got data.
php artisan migrate:fresh --seed
This will cleanout our databse, run all migrations, and then the main DatabaseSeeder class (which in turn will run our ContactSeeder).
So let's do that, and look at our database..!
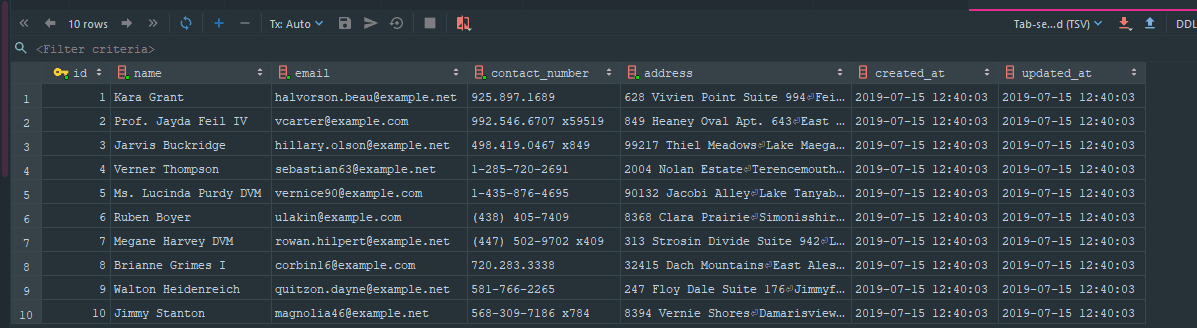
Screenshot of our database table, `contacts`
Next Week
Now we've got data, we need to expose it over the internet and allow our users / clients to do their required BREAD funcationality.
So next week we'll move onto Controllers, Routing, and potentially Authentication and Policies - however I think that'll be Episode 4 if I'm honest.
If you're reading along with these posts, let me know on twitter and share it around. I've been enjoying the feedback lately and personally read every message.